
Getting started with htBuild

htBuild : Sass for your HTML?
htBuild is a compiler for HTML, like sass for CSS. It lets you use variables in html. You can also create your own components in HTML without using any JavaScript. htBuild brings simplicity at its peak for using components and variables in HTML.
Where can I get htBuild?
htBuild has a package on npm a package registry for JavaScript. You can install htBuild by using npm command.
npm install -g @thedivspace/htbuild
Now you have access to htBuild CLI. htBuild CLI lets you create htBuild project, build project and start live server.
Creating a new project
You can create a new project by using htBuild CLI’s init command. Open your CMD/Terminal and type following command.
htbuild init
init command does following things.
- Create Directories
- Add Hello-world template
- Build Project
- Start Live Server
Congratulations! 🎉🎉 your first htbuild project is created. Once build is finished you can see the following welcome page opened in browser.
Exploring the project structure
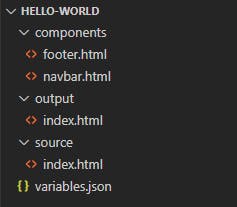
htBuild Project has mainly 3 directories.
components directory stores the components you make.
output directory stores the HTML generated by build command.
source directory stores your source HTML and other code files like CSS, JS, etc.
It has a JSON file called variables.json. In this file you can define global variables which you can use across the project.
Creating first Component
Okay, as we have created a new htBuild project and we have seen project structure. Let’s begin our first component.
In this project I am going to create a card with the help of bootstrap. Create a file in components directory named mycard.html. Add following code to the component.
<div class="col-3">
  <div class="card" style="width: 18rem;">
    <img src="https://images.unsplash.com/photo-1588392382834-a891154bca4d?ixid=MnwxMjA3fDB8MHxwaG90by1wYWdlfHx8fGVufDB8fHx8&ixlib=rb-1.2.1&auto=format&fit=crop&w=1355&q=80" class="card-img-top" alt="...">
    <div class="card-body">
      <h5 class="card-title">Card title</h5>
      <p class="card-text">Some quick example text to build on the card title and make up the bulk of the card's content.</p>
      <a href="#" class="btn btn-primary">Go somewhere</a>
    </div>
  </div>
</div>
Now our component is ready. Let’s see how you can use mycard component in your source file. Open your index.html And add the component as shown below. Now as you save the index.html browser will reload automatically and you can see the changes you made instantaneously.
<div class="container">
    <div class="row">
        <ht-component data-component="/mycard"/>
        <ht-component data-component="/mycard"/>
        <ht-component data-component="/mycard"/>
        <ht-component data-component="/mycard"/>
    </div>
</div>
Using variables
In htbuild there are two types of variables, global and local variables. Global variables are stored in variables.json and local variables are stored in each of the source html file.
Let's create a new global variable called welcome_message with value “Hello htBuild” .
{
    "welcome_message":"Hello htBuild"
}
After defining variable in JSON file we can use it any of the file by using following syntax {{g_variable_name}}. g denotes global variable.
<h1 class="text-center">{{g_welcome_message}}</h1>
Similarly, we can define local variable with name page_name and value “Index Page” .
<ht-variable data-var="page_name" data-val="Index Page"/>
After defining variable, we can use it with similar syntax to global variable. Unlike g in global variable, we directly use variable name.
<title>{{page_name}}</title>
What’s Next?
In this article we have seen, how to create new project in htBuild, creating and using components and creating and using variables. Now you are ready to develop website using htBuild. If you want to learn more about htbuild, you can check out this link . htBuild is an open-source project by Divspace . You can contribute to htBuild on GitHub .